So this post is a recap of our 2016 beekeeping season. The trials and tribulations of a wannabee beekeeper.
Jan 2016
This was our first year wintering over bees. I have been like a over protective parent, worrying and hoping they are doing ok.
March 21 2016
Today the bees started bringing in pollen. Lots of activity. Holy moly this is so early. The winter wraps are still on, I think I will leave it on a little longer yet.
April 23
Dandelions are in full bloom. Lots of activity. Removed the winter wraps.
April 30
Removed any leftover winter honey. Lots of new uncapped honey already. New larvae. The bees wintered over great. Definitely will have to do a split.
May 15
Received the Nuc from Barry Clark, from the PG club. I left them in the nuc box over night but fed them syrup.
May 16
Put the nuc in their hive. Added second brood box on the big hive.
May 18
Did a big inspection on the big hive, didn't find any queen or swarm cells. Honey super was almost full. That's nuts. Will a second honey super on soon. Apparently because everything is so early this year, swarm season is early also. So near the end of May beginning of June. Lets hope they don't swarm before the new queens arrives from Rudi
Checked nuc, they are doing great, will check again in a week.
June 15th
Our beautiful Russian Queen arrived (her name is Queen Anna Pavlova) A fellow beekeeper (Mike) came over and help do the split since I had never done one before. He also received his new queens. In 3 days I will remove the lid off the queen cage.
June 24
Checked split, couldn't find the queen but did find new brood. Noticed a few bees with odd looking wings, I didn't want to take any chances so will treat with formic acid.
June 27
I ended up ordering mite away from Armstrong Apiary. Finally found the new Russian queen, she was very black with dark orange stripes. Wish I would of taken a picture of her.
July 5
Had a small swarm. I captured it and gave them a new home. I wrote about the swarm in one of my posts.
July 15
Treated with mite away. All hives
July 23
Checked swarm hive (hive 4). quite a bit of new larvae. Quite a bit of capped and uncapped honey.
July 26
Added honey super on the split hive. There is a total of 3 boxes. Big hive (4 boxes) Nuc (3 boxes) Swarm hive (2 boxes.
Also had to order more frames and foundation today...yikes where are they all going???
Aug 24
Put in syrup feeders on all hives. Hope to pull honey soon. It should of been done already but we have been soooooo busy at the motel, I haven't had the time.
Aug 30
Put sticky boards in hives to check for mites. I will treat where needed.
Sept 1
Finally got the big hive ready for winter. The bees are in one box now, with one full honey super on top.
Sept 2
Got the last 3 hives done. I put feeders in empty attic boxes and pollen patties. Will keep feeding them until the beginning of Oct, then pull them.
Oct 9
Remove feeders and put insulation in the attic boxes. Put winter wraps on the hives and say good night for the winter.
Things I learnt this year
Regardless how busy the Motel is.... REMOVE THE HONEY AT THE BEGINNING OF AUG WHILE ITS STILL HOT OUTSIDE.
Ok I promise this time....this really is the last post of 2016. Happy New Year
Wednesday, December 28, 2016
Saturday, December 17, 2016
Merry Christmas
To get in the Christmas Mood, here's
a little song to send you into the holiday season.
I hope everyone has a very Merry Christmas and a Bee-utiful New Year

a little song to send you into the holiday season.
I hope everyone has a very Merry Christmas and a Bee-utiful New Year

Wednesday, December 7, 2016
Curry Honey Mustard Wings
Years ago while attending Culinary School, I was given this recipe from a fellow student who had become a friend. This recipe can never be said to lack flavor. If you love honey mustard anything....and love curry, you are going to love this recipe. I use wings but you can also use drum sticks or thighs. Hope you enjoy them!


2 to3 pounds of chicken wings
1/4 cup of yellow mustard
3/4 cup of Riverside Apiary Honey (any honey will work. heheheh)
1 tsp salt
1 Tbsp curry (or you can use more if you like them hotter)
Preheat oven to 375
Baste wings and put on cookie sheet that's lined with foil. Bake 1 hour and baste every 15 minutes.
Save some of the sauce for dipping while eating.
Wednesday, November 30, 2016
Dandelions and Honey
While working with the bees this summer, I suddenly remembered I was given a Golden Dandelion Jelly recipe years ago. I had good intentions at the time to make it, but like a lot of things...it never happened. This was going to be the year I finally make it. I decided I would make it with some of our very own honey instead of sugar.
I could hardly wait to go home and pick the last of the dandelions and try a batch. I dug out my recipe box and after some time finally found the tattered old card. It required a quart of dandelion flowers. After picking them I sat down and researched if I could substitute honey for sugar in canning. From everything I read I could but it was recommended that I could replace about half the sugar with honey. So that's what I did.
Although a lot of work, it was well worth it. It has a beautiful golden color and the taste...well its quite incredible. When you first put it in your mouth, you can definitely taste the honey, then you can taste citrus and right at the end, a nice grassy note.
Below is the recipe.

Golden Dandelion Honey Jelly
Snip off the stems and green collars of the flowers. Rinse one quart of blossoms in cold water. Put one quart of water and the rinsed blossoms in a pot and boil for 3 minutes. Let cool. When cool, strain and press pedals with fingers to extract 3 cups of juice.
Add 2 tablespoon of lemon juice, and a box of pectin (1 3/4 oz). Bring to boil in a jelly kettle. Add 2 3/4 cups of sugar and 2 3/4 cups of honey. Stir well and let boil for 3 minutes. Pour into sterilized jars and seal.
Although the bees that made the honey for this recipe are now gone, we can now enjoy the fruits of their labor all winter..

Tuesday, November 29, 2016
Winter Ramblings...part 1
I knew I couldn't go very long without finding something to chat about. Winter can last a while in Northern BC and that's a very long time to go without chatting about my bees.
Well since its official and winter has set in now, the bees are tucked inside their warm hives and only wander out briefly. So there is nothing much to report.
Below is a picture of what winter looks like this time of year here in the Robson Valley

Well since its official and winter has set in now, the bees are tucked inside their warm hives and only wander out briefly. So there is nothing much to report.
Below is a picture of what winter looks like this time of year here in the Robson Valley
 |
| Winter at the Motel |
 |
| Fraser River |
 |
| First snow in the bee yard |
Next time, I will be sharing a recipe of mine, using Dandelions and Honey.

Its suppose to be winter
Well here it is November 9th and the past two days have been rather balmy. So balmy in fact, the bees decided it was nice enough to come outside during the afternoon. Yesterday was warmer than today but both days brought sunshine and warm temperatures.
I shot this little video to record the bees activity during this unusually warm days.
I shot this little video to record the bees activity during this unusually warm days.
You can really tell we are still newbees, yesterday James found a bee sitting on his truck, it was later in the afternoon and it had started to cool down some, so he picked it up and carried it back to the bee yard. This morning we rescued one that fell in our little ditch full of water...we are a sappy couple when it comes to the bees.
I have decided that during the winter I will be posting recipes, using our honey and maybe even talk about bee books I have been checking out.
Until then...cheers
Friday, October 14, 2016
Its out of my hands now.
October 14th
We finally finished putting the bees to bed for the winter. Its out of my hands now. You kinda feel helpless. You do all you can do to help them survive the winter but in the end its out of your hands.
You can only hope the moisture level doesn't get too high, or the winter isn't tooo long that they run out of food or the mites you treated for, all died.
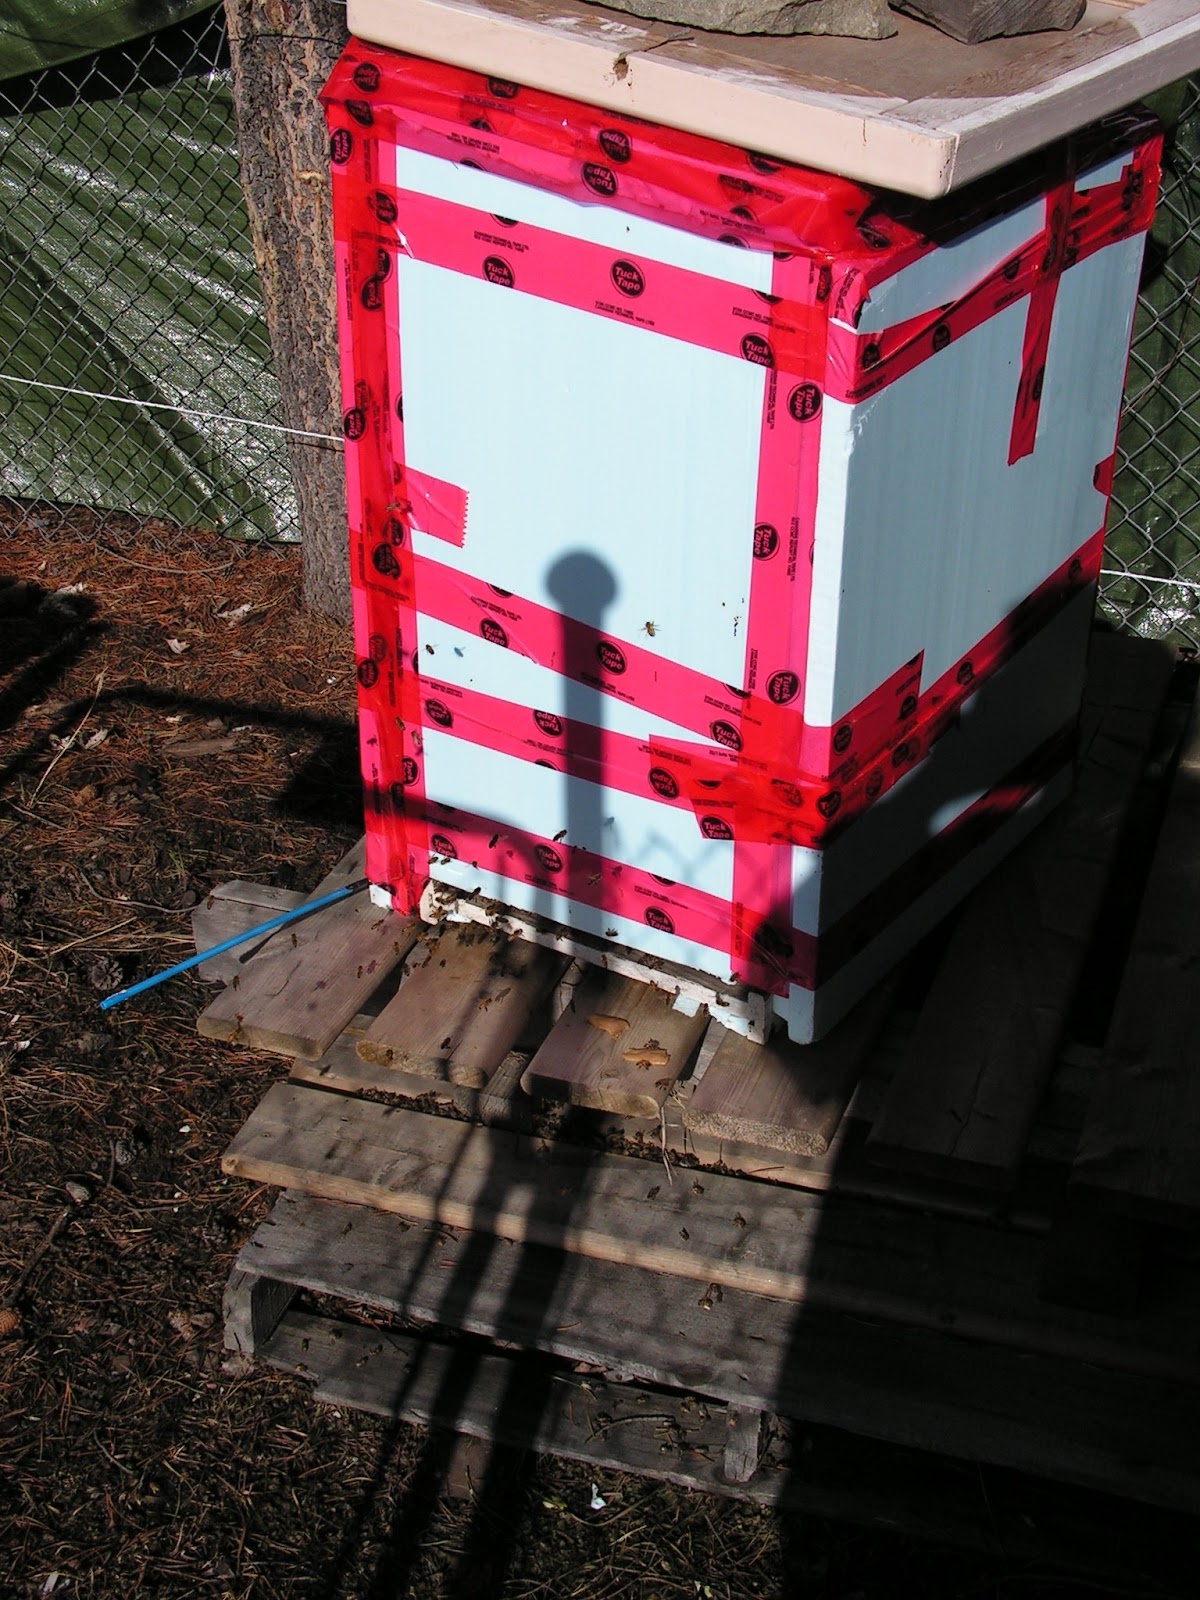
Below is the wrappings we did on the outside of the hives. It certainly wont win any award for the best curb appeal, but it works. This year since we had 4 hives, I decided to wrap two hives together.

 The Styrofoam is wrapped around the hives and tuck taped together, then this year I put a strap around the whole thing, just to hold it together.
The very last thing I did was drill a hole thru the insulation and the top box. This hole is in the attic box, it serves as a top vent to help get rid of excess moisture. Plus its also handy as I discovered last year....during the winter I could stick my finger in the hole and if I could feel warm air, I knew the bees were still alive.
So as far as anymore chores to do during the winter, there isn't much to do.
There are a couple things I do, one is go out and make sure their door way is clear of snow or dead bees. I have a long skinny piece of bamboo I use to poke in the opening and kinda sweep any dead bees out of the entrance area. Its normal to find dead bees during the winter and its very important not to let them pile up and block the entrance so there is no air circulation.
So that's about it for the bee season. This winter, I will make plans for next spring. read lots and learn as much as I can about these interesting little creatures. And hopefully next year all our hives survive the winter and I will hopefully have learnt more about being a better beekeeper. I might find the odd thing to write about during the winter, but if not........Have a great winter.

We finally finished putting the bees to bed for the winter. Its out of my hands now. You kinda feel helpless. You do all you can do to help them survive the winter but in the end its out of your hands.
You can only hope the moisture level doesn't get too high, or the winter isn't tooo long that they run out of food or the mites you treated for, all died.
Below is the wrappings we did on the outside of the hives. It certainly wont win any award for the best curb appeal, but it works. This year since we had 4 hives, I decided to wrap two hives together.


The very last thing I did was drill a hole thru the insulation and the top box. This hole is in the attic box, it serves as a top vent to help get rid of excess moisture. Plus its also handy as I discovered last year....during the winter I could stick my finger in the hole and if I could feel warm air, I knew the bees were still alive.
So as far as anymore chores to do during the winter, there isn't much to do.
There are a couple things I do, one is go out and make sure their door way is clear of snow or dead bees. I have a long skinny piece of bamboo I use to poke in the opening and kinda sweep any dead bees out of the entrance area. Its normal to find dead bees during the winter and its very important not to let them pile up and block the entrance so there is no air circulation.
So that's about it for the bee season. This winter, I will make plans for next spring. read lots and learn as much as I can about these interesting little creatures. And hopefully next year all our hives survive the winter and I will hopefully have learnt more about being a better beekeeper. I might find the odd thing to write about during the winter, but if not........Have a great winter.

Monday, October 10, 2016
Getting ready for winter
October 10th
Well I finally started winterizing the bees. It began a few days ago when we tarped the north/east sides of the bee yard. We get a lot of winds here in McBride so its nice to block them during the winter. Then yesterday I started insulating the attic boxes.
What I do is take a regular honey super and remove all the frames. I first lay the inside cover directly on top of second box which houses the winter food. I staple metal window screen over the opening in the inside cover. Then I take the empty super and place it on top of the inside cover. I then take a old pillow case and place fiberglass insulation in it then place it in the empty super. This is my insulated attic box.
So yesterday I tackled all but the big hive. So it felt good to get that done. Today armed with smoke and all the tools I needed to remove the top box which had some leftover frames of honey, I set out. To my surprise there were only a very small handful of bees in the top box so it was pretty easy and no smoke required. And best of all we got 2 frames of honey, which I decided to save for the bees in the spring.
At supper tonight we were watching the news and seen that the temperatures are suppose to drop down to -10C. So I decided we are going to start wrapping the hives tomorrow. But before we do that, we need to move 2 hives together on one pallet so we can wrap two hives together. Hive #3 and #4 are already on the same pallet so its just a case of lining them up and wrapping them. The difficult one is of course the Big Hive. I had this brilliant idea this spring to set it on this plastic pallet we got but during the hot summer months and the heavy honey flow...the plastic pallet started to collapse. So while james tipped the hive I placed little pieces of wood under it to prevent the hive from tipping over. You can see it in the photo below.

So now we will have to lift it up and carry it over to the pallet next to it. How fun is that going to be.
Anyways we will get her done. And I will post photos of us doing it and how we go about wrapping them for the winter. That's it for now.
Tuesday, September 6, 2016
Sticky Business
Well here it is Sept 4th and I am finally getting around to extracting honey. We got all but 4 frames of honey out of the hives, I decided to leave those frames there as it was still uncapped. If we were to take uncapped honey, it would ferment, so the plan is to leave it in the top super which will become the attic box when we put the bees to bed for the winter. The bees will cap it once the humidity level is just right, then I will latch on to it and maybe save it for spring for them or take it for us. More than likely I will keep it for the bees.
I learnt a ton of stuff today. I learnt that if your house is cool, the honey will be thick like molasses. I also learnt when you spin honey in the kitchen and the machine has no lid.....need I say more. Its going to take me a good week to clean up once I am done.
So we began with uncapping the frames of honey and placing two the frames in the extractor.
Uncapping the honey


Spinning the honey out of the frames

Then we spun the frames for about a minute on both sides. Once all the frames are done, then you begin the very sticky business of running the honey through 2 sizes of sieves. Sounds quick and easy but for a couple newbees....it took almost 2 partial days to complete the whole job. I am still wiping up sticky door knobs, countertops, dishes, floor, dogs heads and chairs. The only thing left other than putting the honey in jars and containers, was to clean beeswax. This is one of my favorite things to do. Like the honey....the end result is so rewarding.
The end product, beeswax and honey

I learnt a ton of stuff today. I learnt that if your house is cool, the honey will be thick like molasses. I also learnt when you spin honey in the kitchen and the machine has no lid.....need I say more. Its going to take me a good week to clean up once I am done.
So we began with uncapping the frames of honey and placing two the frames in the extractor.
Uncapping the honey

Placing the 2 frames in the extractor


Wednesday, August 31, 2016
Testing for Varroa Mites
I am not a technical person, so this is just the basics of the Varroa Mite. A person can write all about them and how they work and what happens to the bees, but the long and short of it...they are bad and they need to go.
Varroa Mites are nasty little critters that will end up living off the larvae in the hive. If left untreated they can kill your hive by the time spring comes. So its important to test for them in August and then again in the spring and if need be, treat them.
There are several methods of testing, but for me this year I decided to do the sticky board test. Its a piece of cardboard that you lay a plastic mesh on so the bees won't stick to it. You slide the board on top of the bottom board of the hive. You can leave it up to three days or as little as one day. I did one day this year out of ease as its still quite busy at the motel.

Varroa Mites are nasty little critters that will end up living off the larvae in the hive. If left untreated they can kill your hive by the time spring comes. So its important to test for them in August and then again in the spring and if need be, treat them.
See it on her back. Yuk
Disgusting little things
There are several methods of testing, but for me this year I decided to do the sticky board test. Its a piece of cardboard that you lay a plastic mesh on so the bees won't stick to it. You slide the board on top of the bottom board of the hive. You can leave it up to three days or as little as one day. I did one day this year out of ease as its still quite busy at the motel.

I have circled the mite so you can see it easier. They are so tiny, the grid is 1 square inch. I still have one more hive to check but over the next day or two, I will decide if I need to treat. So far it looks pretty good but we will see. Once this is done, you are one step closer to getting the bees ready for winter.
Saturday, August 27, 2016
Random ramblings and pretty pictures
So since the beginning of Sept I have put feeders in all the hives. I mix a sugar/water syrup, 2 parts sugar 1 part water. Mixing it thick like this, apparently is best as there is a short window of time for the bees to turn this into food for the winter. It you mix it 1 to 1 they may not have enough time to get the moisture level down.
Even though there is not much to do right now, I still go out several times a day, I find any excuse I can to check on them. I will fill their water bowl...or just stand there and stare at them. Or take a picture or two. I couldn't resist the other day and had to snap away. Look at that face. So cute
Here are a few photos I took during the summer and over the past couple weeks. Some of the bees are honey bees, some are bumble bees and some are another kind of bee which I don't know but are equally as photogenic


Saturday, August 6, 2016
Under Wraps for the winter (winter of 2015)
2015 was our first winter with the bees. I really stressed over it because its hard wintering over bees in the north. I had read all kinds of articles, talked to lots of seasoned beekeepers, then finally decided what we would do.
Our town is quite windy, my gut told me we needed to protect them from some of that north eastern winds that blow during the winter here. And since the bees were in a chain link enclosure, the solution was simple, I would tarp the north and east sides of the fence. The insulation of choice was 2 inch Styrofoam.
Some months earlier we had decided to combine the 2 hives together for the best survival rate during the winter. I then compressed all the bees into one brood box, then put a honey super ontop of that with 10 full frames of honey. On top of the honey super I placed an inside cover with screen over the opening, then a empty box which we called the attic box. Inside the attic box, we put fiberglass insulation inside a old pillow case. Then put the outside cover ontop.
We had cut the Styrofoam then tuck taped it around the hive, leaving the entrance open. I had decided not to have a top vent hole after having many conversations whether to have one or not. Because of a recent surgery, we didn't get the bees wrapped up until the beginning of November. Thankfully mother nature was kind and the weather was quite mild up to that point. I was relieved we got it done.
That night while I was suppose to be sleeping, I started worrying about the lack of a top vent.
I worried that the condensation would build up in the hive during the winter and come spring the bees would all be dead. So first thing the next morning....I drilled a hole in the attic box to help let any extra condensation escape.
This is what the winter wrap looked like....not very pretty but it worked.

Saturday, July 23, 2016
White Owl Cigars
In the winter of 2014, I had gone down to the coast for my Dads funeral. During my time down there I got to visit with my Mums brother, Uncle Bill.
I mentioned to him that I had ordered bees and was really looking forward to finally get into beekeeping. He said "Oh really?" There was a long pause, then he said....."well then, you will have to get some White Owl Cigars" I was kind of stumped. Then he preceded to tell me that whenever my Great Grampa (Alexander Forrest) would go out to tend the bees, he would light up a white owl cigar. It was his way of gearing up, I guess. No gloves, no veil or special jacket.... just the sweet scent of a white owl cigar.

Saturday, July 16, 2016
Beeing Cranky
I guess Bees have a right to get cranky like we do. But what is it that set them off. Some say, weather can make them cranky, either what's happening today or upcoming weather changes. Others say it could be a problem with the queen. Or maybe its just regular old crankiness. Who really knows?
I just know the other day I went out to put some Mite a way strips in all the hives to treat for Varroa Mites. I had done the Nuc first, then the Split (yes I have names for all our hives) I had decided to leave the Big Hive till the end. The first two hive went along smoothly. While I had the hives open it was a good time to see how the honey production was coming along. I kind of dreaded doing the Big Hive because of the weight of the honey super, it was full and I was afraid I may drop it.
Anyways, I preceded, I removed the top cover and inside cover, then lifted off the top super, then I was at the full honey super. I got it off ok and set it aside. Taking advantage of tearing apart the hive I decided to remove the queen excluder and leave it off. So far so good. Next came the second brood box, I slowly pried up the corners and lifted it off. Out of no where came an explosion of bees. 1000's of them, all ticked off with me for disturbing them. They was not happy, I was covered head to toe with bees and they were trying their best to have some pay back.
I decided when they didn't let up, I would go for a little walk and let them simmer down some. I got half way across the driveway and they were still bouncing off me, so I went farther and farther and ended up behind the motel. Slowly they started letting up a bit. By this time my legs and bum were starting to feel like a pin cushion, then I felt a sting on my ankle. I pulled off my gum boat and whipped off all the bees out off my pant leg. By the time I came around to the front of the motel the bees were pretty well gone.
Next to our bee yard is where we cut and stack the firewood, so its fairly close, and while I was working in the bee yard, James and Ray were splitting firewood. As I glanced over I saw Ray running across the yard waving his arms. Oops! I then noticed James shutting down the splitter and walking away. Apparently the cranky bees were mad at them too. (teehee)
To be continued........

Thursday, July 14, 2016
And so it begins. Part 2
So we watched the "weak" hive over the summer, checking to make sure the new queen was laying. It still didn't appear to be expanding as we figured it should. Late Aug 2015 we tore the hive apart and had a real thorough inspection, and we found lots of Drones and Drone cells. So after much discussion we decided to get rid of the queen and combine this hive with the other hive for the winter. We felt the weak hive just didn't have enough bees to survive the winter. Winter was quickly approaching so we had to move fast.
Near the end of Aug, we found out this was the time to check for Varroa Mites, so we did that. Then on the 30th we prepared to combine both hives. We were instructed to "disperse" of the queen, then remove the top cover and inside cover of the good hive, place 1 or 2 sheets of newspaper over the box, then place the box from the weak hive over that. Place the inside and top cover on it and leave it for a few days to a week.
After a few days the bees from both colony's chewed thru the newspaper and by then they were accepted in and the weak hive accepted the other queen as theirs.
In the beginning of November we compressed the bees into 2 boxes for the winter and wrapped them up.
This spring we were excited to fine the hive was in great shape and the plan was in June 2016 we would get a second queen and do a split.
I can't believe what I learnt this last year from having a few problems like that. You have to learn real quick or lose the bees. I am far to stubborn to let them die without giving it my best. And this time it worked.
 Checking things out

 Appearing a little Beewildered
Near the end of Aug, we found out this was the time to check for Varroa Mites, so we did that. Then on the 30th we prepared to combine both hives. We were instructed to "disperse" of the queen, then remove the top cover and inside cover of the good hive, place 1 or 2 sheets of newspaper over the box, then place the box from the weak hive over that. Place the inside and top cover on it and leave it for a few days to a week.
After a few days the bees from both colony's chewed thru the newspaper and by then they were accepted in and the weak hive accepted the other queen as theirs.
In the beginning of November we compressed the bees into 2 boxes for the winter and wrapped them up.
This spring we were excited to fine the hive was in great shape and the plan was in June 2016 we would get a second queen and do a split.
I can't believe what I learnt this last year from having a few problems like that. You have to learn real quick or lose the bees. I am far to stubborn to let them die without giving it my best. And this time it worked.
 Checking things out
 Appearing a little Beewildered
Thursday, July 7, 2016
To swarm or not to swarm....
July 7th 2016. The day began like any other day at the Motel. Plenty of guests last night so lots of laundry and cleaning to do. We finished the cleaning by noon but the laundry had only been going a short time.
I decided since it was a nice day I should go check the bees water bowl. Everything was as it should be. Lots of action, going in and out, collecting pollen. James decided to cut lawns so I carried on with laundry. 10 minutes after he started, he come in the laundry saying "I think the bees are starting to swarm!" No it can't be I replied, I have never dealt with a swarm before.
So we hurried out to see and sure enough by this time they had begun to cluster in a Pine tree. Trying to remain calm, we ran and got 2 boxes, a sheet, a outside cover and a bottom board. But our supplies were slim pickins. I did get 2 boxes and the lid but there was no bottom board. The inside cover was the type that had a small 1 1/2" opening in it, I could use this as a bottom board. So armed with our supplies, we went out and laid out a plan. (ok so I didn't really have a plan but I hoped one would come to me soon.)
I made a quick phone call to a friend who has been on several recovery of swarms. She gave me a couple pointers and off we went.
Since I am the only one in the family with a bee jacket and gloves, I was the one who was going to retrieve them. We got the 11 ft ladder and placed under the swarm. I went up with my pruners and a pruning saw. I clipped the surrounding branches, then James gave me a few pointers on where to saw the branch and so I begun.
I tried being gentle so I didn't shake off too many bees. When I finally cut through it I carefully grabbed the branch with both hands and made my way down the ladder and over to the box. I laid the branch inside the second empty box and left it. Then I wandered over and found the remaining swarm was clustering again on the branch above the first cluster. I decided not to cut the branch this time, I chose to shake them into one of them 2 gallon ice cream bucket and then put the lid on . So that's what I did and it worked like a charm.
Once I got them over to the box I dumped them inside and put the lid on, leaving it propped open so the stragglers could go in. An hour later we checked them and they seemed to accept their new house and were busy coming and going. That evening, when they were all inside I closed the cover.
I worried they may leave overnight so was anxious to check on them first thing in the morning. To my surprise, they were there and already out collecting Pollen. Later in the afternoon, we lifted the box up and carried it into the bee yard. They are now part of the family and have the number 4 on their hive box. We haven't figured out which hive they split from yet, but in the next couple days we will look and see.
 Me cutting the branch off.
 Tucked away in their new home
Tuesday, July 5, 2016
Too much excitement for a WannaBee
Today was one of them day. Very busy night at the Motel, so today there lots of rooms to clean and laundry to do.
I didn't really need this to happen, but it did. I will tell you all about it soon. Stay tuned. Here's a hint
"I see you"

I didn't really need this to happen, but it did. I will tell you all about it soon. Stay tuned. Here's a hint
"I see you"

Thursday, June 30, 2016
I can't help myself
I have a problem. I love to paint things. I can't help myself, nothing is safe from my obsession to paint things pretty colors. So needless to say, I had to paint the bees boxes. This is how they looked when we got them. How could anyone leave them like this, they are so.....average. (in my mind)


This is how they look now. Don't they make you happy. I smile whenever I see them and I am quite convinced the bees love them too.
Tuesday, June 28, 2016
And so it begins
So our two Nucs arrived at the end of May last year, our friends had drove down to the coast and picked them up on the way back. The bees arrived in good shape and once set up, they were off to work.
Both hives started off great, they were busy setting up shop in their new houses.
As the weeks went on, we noticed that one hive was not as robust as the other, and as time went on, it was apparent they were certainly the weaker of the two. We opened the hive and checked for the queen and it appeared to my untrained eyes, that it was all in order.
About 10 days later James came in the house and said, you have major dead bees lying outside. I was sick, no one likes to see dead bees, especially that many.
So we tore apart the hive and found there was no queen. The bees now seemed to have no purpose, they had eaten most of the stored nectar and were slowly starving to death. We did find a Queen Cell though...so that was good, at least they were making a new Queen.
I quickly mixed up some syrup and started pumping that to them. When I came in the house I put the plea out for advice. I had found this super Facebook page on beekeeping on Hwy 16 some time ago, so immediately asked for help.
That evening the advice started rolling in. I was instructed to open up the good hive and find some new brood,( new uncapped brood) remove a frame of them out of the hive and place it in the weak hive.. This will give the bees something to do plus they can make a new queen out of one of the cells, if they choose.
So we did that and Viola...it worked. The hive was alive and well again within 24hours. I couldn't believe when there was soooo many dead a couple days before, now they were busy working again.They had a purpose.
Over the past two years I have asked so many (probably mostly dumb) questions to that Facebook site and they are so willing to help out a Newbie. I would be so lost without them. I will continue the saga of the weak hive in my next post.
Monday, June 27, 2016
A little history
Welcome to my blog.
I will be mostly talking about the fun times and the not so fun times raising my bees.
I first got the beekeeping bug years ago. My Grampa and Great Grampa Forrest had a commercial nursery. They worked side by side building up their business after immigrating from Scotland in the early 20's. They mostly grew flowers, so it only made sense that they also kept bees. The bees and greenhouses were gone before I came along but hearing the stories gave me the urge to keep bees one day.
I remember seeing a few tools that he still had left, but mostly it was the 50 year old honey they found when him and Grama were preparing to move from the farmhouse. Poppa gave me some and I ate it. I think right there was when I knew someday I would get bees.
Well some 30 years later, I finally did it. Last year a friend and I bought 2 hives.
I was completely in the dark about beekeeping. But what better way to learn then to dive right in head first. And so I did.
As a nod to my Grampa and his father, I have named my Apiary after their nursery business, Riverside Nursery.
So welcome to Riverside Apiary, I hope you will enjoy it.
Here are a couple of photos. One is of my Great Grampa (Alexander Forrest) this photo is of him and their flower displays at the PNE, where they would display their flowers, honey and bees wax.
The second photo is of my Grampa (John Forrest) and his dad (Alexander Forrest).

 Great Grampa Grampa and Great Grampa
I will be mostly talking about the fun times and the not so fun times raising my bees.
I first got the beekeeping bug years ago. My Grampa and Great Grampa Forrest had a commercial nursery. They worked side by side building up their business after immigrating from Scotland in the early 20's. They mostly grew flowers, so it only made sense that they also kept bees. The bees and greenhouses were gone before I came along but hearing the stories gave me the urge to keep bees one day.
I remember seeing a few tools that he still had left, but mostly it was the 50 year old honey they found when him and Grama were preparing to move from the farmhouse. Poppa gave me some and I ate it. I think right there was when I knew someday I would get bees.
Well some 30 years later, I finally did it. Last year a friend and I bought 2 hives.
I was completely in the dark about beekeeping. But what better way to learn then to dive right in head first. And so I did.
As a nod to my Grampa and his father, I have named my Apiary after their nursery business, Riverside Nursery.
So welcome to Riverside Apiary, I hope you will enjoy it.
Here are a couple of photos. One is of my Great Grampa (Alexander Forrest) this photo is of him and their flower displays at the PNE, where they would display their flowers, honey and bees wax.
The second photo is of my Grampa (John Forrest) and his dad (Alexander Forrest).


Subscribe to:
Comments (Atom)